Calendar and Meeting Assistant
The Calendar & Meeting Assistant helps you automatically record, transcribe, and analyze your meetings without manual uploads. By connecting your calendar and choosing a recording method, the platform can join meetings for you and turn conversations into transcripts and insights. Meeting Assistant is the default recording method after connecting a calendar, but it will not automatically join meetings until you either select individual meetings or configure matching keywords.
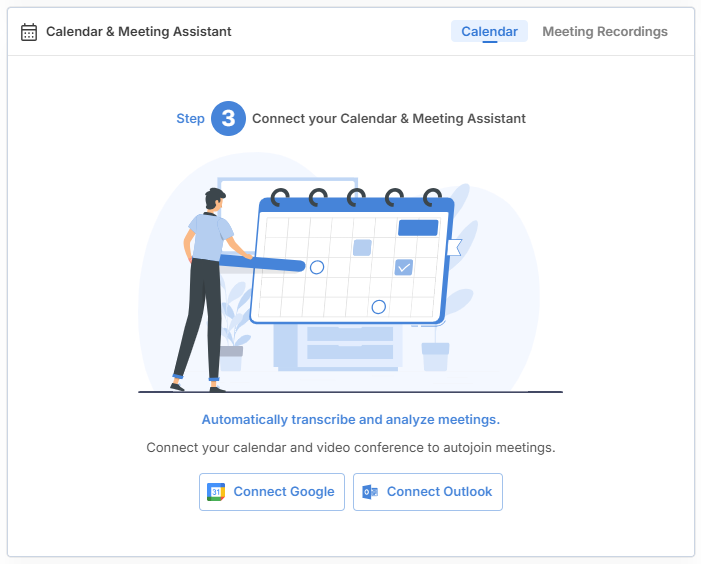
Step 1: Connect Your Google or Outlook Calendar
From the Home page or Calendar section:
-
Click Connect Calendar.
Choose your preferred calendar provider:
- Connect Google
- Connect Outlook
Connecting Google Calendar
- Go to the Calendar block on your Home page in Innovation Within.
- Click Connect Google Calendar.
-
When prompted, choose the account you want to connect.
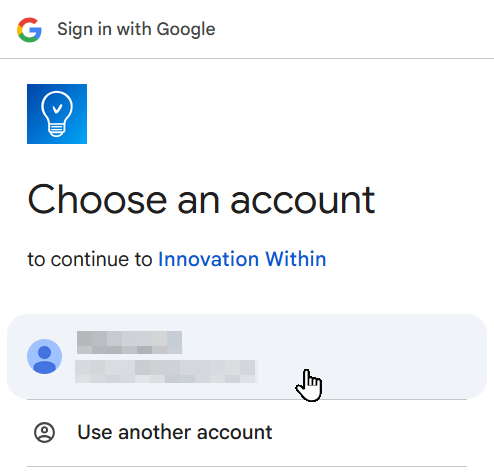
Choose an Google Account -
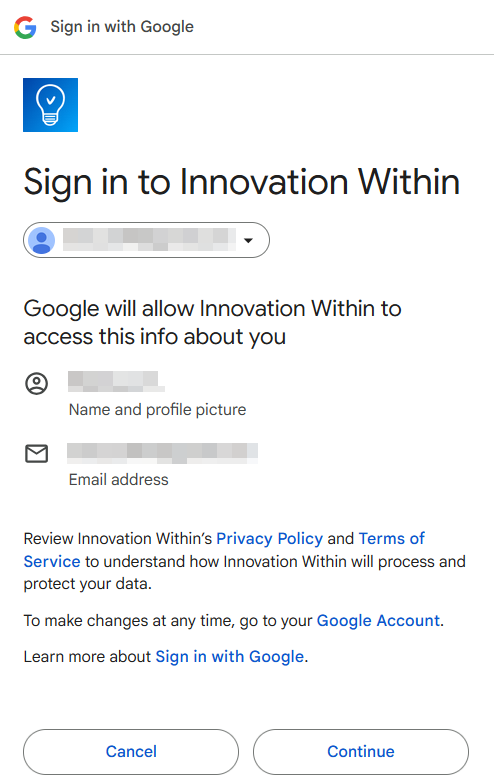
Review the permissions and click Continue to allow access.
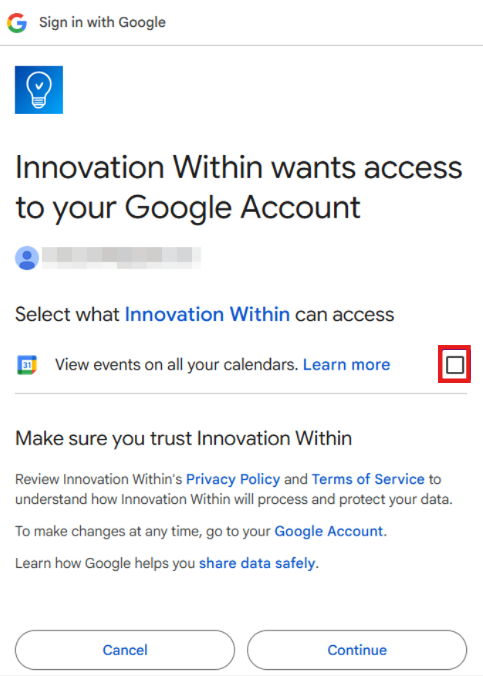
Sign in with Google - On the next screen, check the box to allow Innovation Within to view events on your calendars, then click Continue.


Connecting Outlook Calendar (Microsoft)
- Click Connect Outlook.
- Sign in using your Microsoft account (Outlook or Microsoft 365).
- Review the requested permissions.
- Click Accept to grant access.
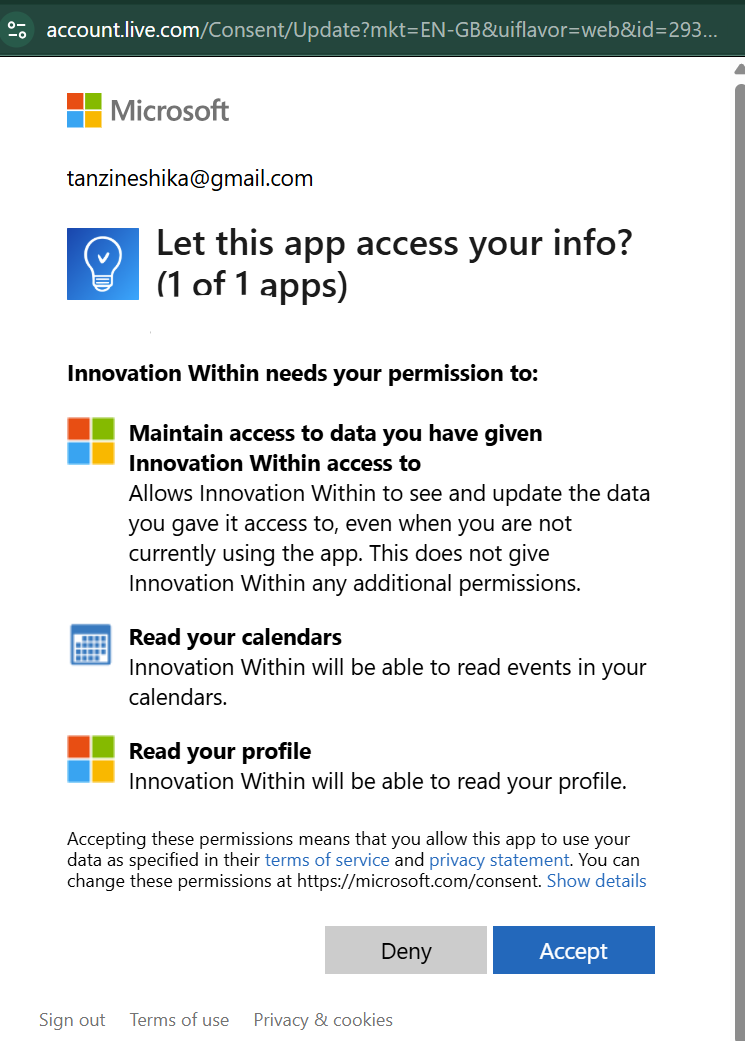
The platform requests permission to:
- Read your calendar events
- Maintain access to granted data
- Read your basic profile information
After accepting, your Outlook calendar will sync, and your scheduled meetings will be visible in the platform.
Step 2: Review Your Calendar & Meeting Assistant Page
After your calendar is connected, your upcoming meetings will appear on the Calendar & Meeting Assistant page.
By default, Innovation Within uses the Meeting Assistant recording method. However, the assistant will not join every meeting automatically.
You can control which meetings the assistant joins in two ways:
- Turn on the assistant manually for individual meetings.
- Use title keywords so the assistant automatically joins meetings that match your selected keywords.
Each meeting row includes a Join Assistant button and a toggle. Use these controls to choose which meetings should be recorded.
Step 3: Choose Which Meetings the Assistant Should Join
On the Calendar & Meeting Assistant page, you can choose which meetings the Meeting Assistant should record.
You can enable the Meeting Assistant in two ways:
-
Enable the assistant for an individual meeting
Use the toggle next to a specific meeting to allow the Meeting Assistant to join and record that meeting.
-
Join a meeting manually
Click Join Assistant for a specific meeting when you want the assistant to join that meeting.
When the Meeting Assistant is enabled for a meeting, Innovation Within will join the meeting, record the conversation, generate a transcript, and run analysis if analysis is enabled.
Step 4: Use Meeting Title Keywords
You can use the Meeting Title Contains field to automatically identify meetings that the Meeting Assistant should join.
Add or select keywords that match the titles of the meetings you want the assistant to capture.
For example, if your customer discovery meetings are titled Customer Discovery, you can add Customer Discovery as a keyword. The Meeting Assistant will then identify meetings with matching titles.
Use specific keywords whenever possible. Broad keywords such as Discussion or Collaboration may match more meetings than intended.
After adding or selecting the keywords, click Save.
What Happens After the Meeting
After the Meeting Assistant joins and records a meeting, Innovation Within processes the recording and turns it into interview data.
Once the meeting ends, the platform can:
- Upload the recording
- Generate the transcript
- Run AI analysis, if enabled
- Attach the recording, transcript, and analysis to the related interview
In the Calendar & Meeting Assistant page, meeting statuses may update as the interview moves through the workflow, such as scheduled, in progress, processing, and uploaded.
Join Meetings Instantly with a Meeting Link
The Meeting Assistant can join meetings even if they are not on your calendar.
At the top of the Calendar view, you’ll see a field where you can paste a meeting link. This supports:
- Zoom
- Google Meet
- Microsoft Teams
To use it:
- Go to Calendar & Meeting Assistant
- In the Calendar tab, paste a meeting link into the field at the top
- Click Join Meeting
The Meeting Assistant will join the meeting immediately and handle it just like a scheduled meeting.

This is useful when:
- A meeting was scheduled outside your calendar
- You receive a last-minute meeting link
- You want to capture and analyze a meeting without first syncing it to your calendar
Once the meeting is joined, the platform can record, transcribe, and analyze it using the same workflow as other supported meetings.
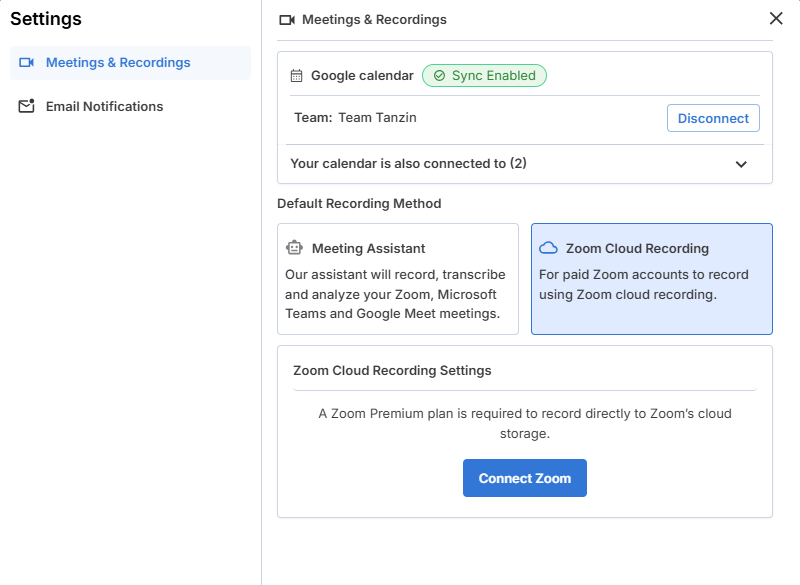
Changing the Default Recording Method
After connecting your calendar, Meeting Assistant is used as the default recording method.
If your team wants to use Zoom Cloud Recording instead, you can change the default recording method from Settings > Meetings & Recordings.
Zoom Cloud Recording requires:
- A paid Zoom account
- Zoom Cloud Recording enabled
- A connected Zoom account in Innovation Within
For full instructions, see the article on Changing Your Default Recording Method.
Using Zoom Cloud Recording Instead of Meeting Assistant
If you use a paid Zoom account, you can connect Zoom to Innovation Within to automatically record, import, and analyze your meetings.
This allows your Zoom recordings to be sent directly to your Innovation Within project after each call.
To connect Zoom in Innovation Within:
- Select Zoom Cloud Recording as your default recording method
- Click Connect Zoom
- Sign in to your Zoom account when prompted
- Review and approve the requested permissions
Once connected:
- Your Zoom meetings can be recorded to the cloud
- Recordings are automatically imported into Innovation Within
- Transcripts and AI analysis are generated after each meeting
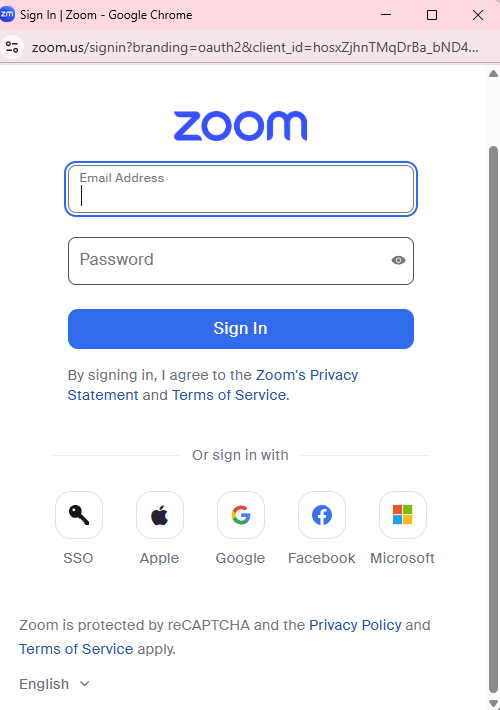
Sign In to Zoom
You’ll be redirected to Zoom’s sign-in page.
-
Enter your Zoom email address and password, then click Sign In,
or
- Sign in using Google, Microsoft, Facebook, Apple, or SSO, if those are connected to your Zoom account.
Grant Permissions to Innovation Within
After signing in, you’ll see a permission screen asking you to allow Innovation Within access to your Zoom account.
On this screen:
- Review the permissions listed (view meetings, recordings, and related data).
- Check the box to Allow this app to use my shared access permissions.
- Click Allow.
This step is required so the platform can access your Zoom cloud recordings.

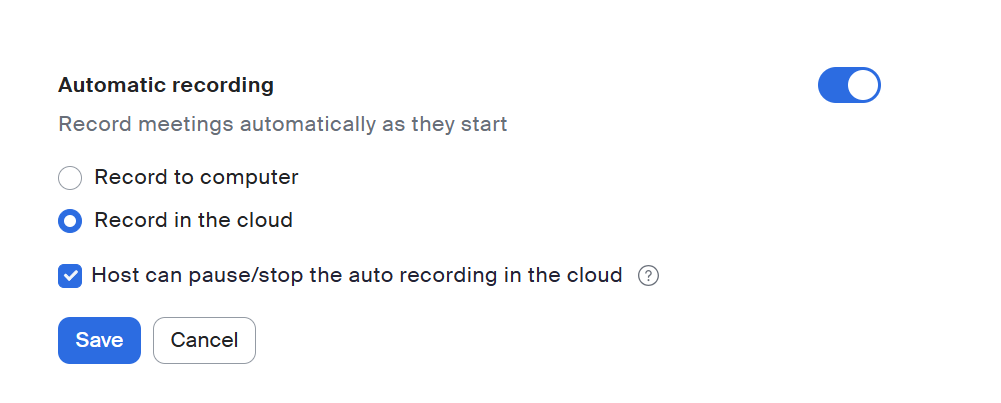
Enable Cloud Recording in Zoom
Option 1: Turn on Automatic Cloud Recording (Recommended)
- Sign in to your Zoom account.
- Go to Settings.
- Open the Recording section.
- Find Automatic Recording.
- Turn Automatic Recording ON.
- Select Record in the cloud (not “Record to computer”).
- (Optional but recommended) Enable Host can pause/stop the auto recording in the cloud.
- Click Save.
Once this is enabled, Zoom will automatically save recordings to the cloud when your meetings start.
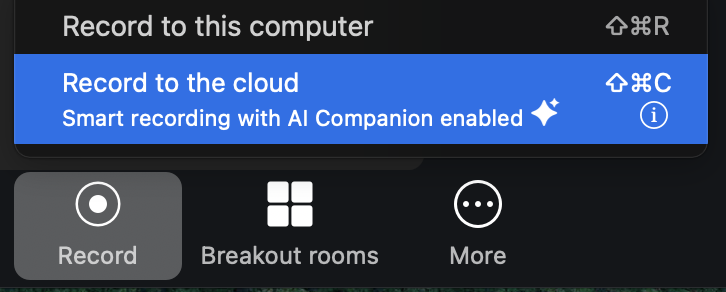
Option 2: Start Cloud Recording Manually During a Meeting
If automatic cloud recording is not enabled, you can still record to the cloud during the meeting:
- Click the Record button in the Zoom meeting controls.
- Select Record to the Cloud (not “Record on this Computer”).
The recording will upload to your Zoom cloud storage after the meeting ends.
AI Analysis (If Enabled)
If AI analysis is enabled for the interview, Innovation Within can generate an analysis after the meeting recording and transcript are processed.
The AI analysis may include:
-
Learning Brief
A concise summary of the most important learning from the interview.
-
Executive Summary
A high-level overview of the full conversation.
-
Explicit Insights
Direct findings based on what the participant clearly said.
-
Implicit Insights
Inferred findings that surface underlying needs, concerns, patterns, or assumptions.
-
Thematic Analysis
Broader themes and patterns from the conversation that may connect back to your Canvas or discovery goals.
Each insight may include:
- A clear description
- Supporting evidence from the interview
- An explanation of why the insight was generated
- Relevant categorization
- Priority level, if available
This helps turn the meeting from a raw recording into structured learning that can be reviewed, shared, and connected to your customer discovery work.
Your Canvas Becomes an Evidence Dashboard
Insights are automatically linked to the relevant hypotheses on your Business Model Canvas.
When you open the Canvas, each hypothesis displays indicators showing:
- The number of supporting insights
- The number of non-supporting (contradictory) insights
Clicking a hypothesis allows you to:
- Review all linked insights in one place
- Play the exact audio clip behind an insight
- Jump back to the full interview transcript
- Decide whether to validate, revise, or invalidate the hypothesis
This transforms the Canvas from a static set of assumptions into a structured evidence repository. Instead of tracking activity, you track justification. You can see, hypothesis by hypothesis, whether your business model is becoming more supported, more fragile, or more uncertain over time.
What It Looks Like in Action
You finish a customer interview.
The recording uploads automatically. The transcript appears. AI analysis runs (if enabled) and surfaces insights tied to your Business Model Canvas.
Now when you open your Canvas:
- A hypothesis in Customer Segments shows 3 supporting insights and 1 contradictory insight.
- A hypothesis in Value Proposition shows 0 supporting insights and 2 contradictory insights.
Those indicators are not summaries. They represent traceable evidence.
You click on a hypothesis.
A panel opens showing:
- Each linked insight, clearly described
- Why the insight was generated
- Whether it supports or challenges the hypothesis
- Its category and priority
From that same view, you can:
- Play the exact audio clip behind an insight
- Jump directly to the relevant moment in the transcript
- Review the full interview context
- Decide to validate, revise, or invalidate the hypothesis
Over time, your Canvas stops being a planning document and becomes a living record of justified beliefs. Each hypothesis reflects accumulated evidence, not optimism.
Troubleshooting Tips
- If meetings do not appear, refresh the Calendar & Meeting Assistant page.
- Make sure your calendar is connected.
- Make sure the meeting has a supported web-conference link.
- If the assistant did not join, check whether the meeting toggle was enabled.
- If using title keywords, confirm the meeting title matches your saved keyword.
- If using Zoom Cloud Recording, make sure Zoom is connected.
- If Zoom recordings do not import, confirm cloud recording is enabled in Zoom.
- If automatic Zoom recording is not enabled, start cloud recording manually during the meeting.